Hello again, gentle reader! It's been awhile.
I haven't been completely idle-- I recently built a couple of guitars! When I tell people this they usually say "oh wow, that's impressive!" or "oh wow, that must have been really hard!" But really, it wasn't so bad at all.
Now, I'd set out to do this with the explicit idea that I would document it for my (and yours as well, gentle reader) reading pleasure and future reference (since it's quite likely not my last guitar). I am after all still young and have a lot left to do in my life. At least that's what I keep telling myself. So. Here it is!
First things first.
-Solid body instruments are much easier than hollow, and need much less tooling to accomplish. This will be A Guide for Solid Body Guitars.
-You don't need to make a neck either, if that's intimidating, since this might be your first time too. Or maybe it's not. The neck is the hardest of any single part to build, and this project was as much about having an awesome end-product as it was about making stuff myself. Sometimes, to make something really awesome, you need help from people who really know how to do things. Warmoth makes excellent necks at great prices and is very good value.
-If you think you might make more than one guitar, do them in parallel. Going through all-the-steps-of-building-a-guitar right after you went through all-the-steps-of-building-a-guitar is probably a lot more pain than doing each step for twice as long. For me, anyway.
Look at that, we're getting into useful information already.
----
Now on to the concrete things.
Stuff you'll need:
A plan
-The better you know the thing that you're going to build, the easier, more efficient and less painless you'll be
Think through all the details:
-exact-as-possible lengths, depth and breadths of every part of the body
-what dimensions and heights of surfaces are required to mount hardware? (what hardware exactly? what are the dimensions of that?)
-how will you finish edges and surfaces? Is flat or curved? In how many axes?
-what tools can work on? Where can you get use of such tools?
I'll talk through my own plan as I detail my process. I'm deliberately holding out on showing you what I did until I talk through a bit of groundwork. After all, I don't want you to build a guitar like mine, I want my guitar build to benefit yours. Before you look at my first picture too hard, work through as much of this process on your own!
Okay, NOW concrete things:
Tools
I got lucky with tooling. Here's what I ended up using:
CNC milling machine // I have access to an open workshop in town where I can use some pretty beefy machines
Circular saw // "
Bandsaw // "
Jointer // "
Drill press (and bits) // "
Soldering iron // ditto up til here
Hand drill
Power sanders (band and orbital) // these can be surprisingly cheap on ebay
Pencil
Straight edge
Right angle
Chisel(s)
Gouge(s)
Block plane
Spoke shave(s) // these all belonged to my friend Andi
Screw drivers
Friends
I am lucky. One of my best friends is a carpenter and did some difficult (and amazing gouge work for me). If you need intros to machines or think you'll need to use tools you don't yet have access to or the skills to use, knowing the right people can be extremely helpful.
Okay, now on to
Raw materials / Parts
Here's what I used and it's just about the slimmest set of ingredients you'll be able to get a working guitar out of:
Warmoth neck (+tuners)
Wood for the body (I used maple, walnut and mahogany I bought on ebay)
Bridge (Hipshot string through)
Pickups (Graph Tech ghost saddles + summing board)
Aluminium sheet (for self made jack plate)
Assorted hardware: mono jack, screws, strap buttons, etc.
Cloth
Shellac (and alcohol)
Gun oil (Birchwood Casey Tru Oil)
Copper shielding tape
Shellac and gun oil make a beautiful, but in my case very thin finish that doesn't provide much protection to the wood. This is a conscious decision on my part that my guitar will show its age. Use a polyester or nitrocellulose finish for something more durable.
----
The moment we've all been waiting for! I built two guitars, and here they are:


Cool, no? Yes, they are electric, and yes, there's a lot that's strange about them. All will be clear soon enough.
**DISCLAIMER** I'm not going to teach you how to use a CNC machine, or a spoke shave, or a soldering iron, or how to glue up, or even how to string a guitar! Because if I do, I'll probably be the worst guide on the internet. If you want to do these things but don't know to do them yet, read something a real expert wrote, or get one to help you. That's what I did **DISCLAIMER**
I'm going to try as much as possible to give you knowledge you won't find anywhere else.
----
My steps:
0. Make a plan! Since I'msecretly in love with Annie Clark, I decided to base my guitars on her Music Man signature model.
0.5 My plan had lots of odd details, it makes more sense to read about them as part of each step of making the guitar.
I started with the idea of a piezo-only solidbody as the ultimate rough-playing easy-setup feedback-free guitar. As I dug around the internet for anything that might help me, I found it had been done already. I also like things to have twins/siblings-- but you already knew I was weird.
0.75 Right, so, make sure you scour the internet for everything anyone's ever done in the direction of what you're doing before you start.
--
1. Buy a pair of necks from Warmoth. They're Pau Ferro on Purpleheart, chosen for colour and stability when unfinished, and quite standard otherwise.
1.5 Buy wood (I decided on the neck woods for visual contrast with the body woods, and the body woods for contrast with each other. The wood itself has much less impact on the sound than neck profile, scale length, pickups, fret material, etc). This was from the outset always to be a weird guitar, and I decided on a zebra pattern of light and dark woods: maple, heart+sap walnut, mahogany.
1.75 Buy bridges from Hipshot. It's good to have neck and bridges on hand before doing any cutting or drilling, so that you can measure them for exact fits.
--
2. Make some drawings. Since I only had to worry about neck and bridge positions this wasn't too hard. I found some Stratocaster and Precision Bass plans on the internet to figure out an accurate technical diagram of the neck pockets. I used Hipshot documentation and some hand measuring for the bridge drilling and placed it on the same drawing as the neck pockets. I had to do a bit of guesswork about where the nut is in relation to the pocket, but I did my best to place the bridge drilling where scale length, measured from the nut, would be in the middle of the bridge's adjustment range.
): I momentarily deleted my cad software, but if you want a .dxf of what I used, just message me and I'll make it available to you!
2.25 Ready your wood! I used the heavy duty circular saw and thickness planer at the open workshop to take each block of wood down to the required size. This really depends on what format your guitar body is gonna be, but it's almost certainly easiest to start with rectangular blocks, glue them together, and then shape that as one piece. I left a bit of extra wood on (0.5-1mm) because these were not final surfaces, and would get taken down again during other steps in the process.
2.5 Cut some wood! I built some gcode off my drawings, fed that into the CNC machine and had it cut the neck pocket and bridge drilling for me without moving the wood block. This ensures that there is minimal misalignment of bridge with neck. If you don't have access to a CNC machine, Stewart-Macdonald sells templates for routing neck pockets with a hand router, and some good ol' hand measurment for bridge drilling can work out just fine (I didn't trust myself at that point)
2.75 Cut some more wood. This is a very optional step and perhaps one of the oddest things about these guitars: I didn't want a front or a back side pickguard or cavity access in order to have as much uncovered wood on the guitar as possible. I cut the cavity into the sides of each wood block before they were glued together. They would line up when the wood was joined, and the access hole would be revealed when the top of the guitar was sloped down. I had to do a bunch of fancy geometry to figure this out. If this is your route, draw it out on paper. It really helps!

2.875 If this is your first time doing something like this, you're gonna make a few mistakes for sure. Sometimes it's a drawing error, sometimes it's a machine code error because you forgot to set the tool size, sometimes it's very careless and simply not stopping a cut before the collet touches the workpiece. Don't be discouraged. Some of these are reversible, and some of these aren't so bad in the end.
--
3. Glue the body blocks together. I used simple white glue: most carpentry is done with this kind of glue: it dries stronger than the wood it will join. I made sure the blocks were the same height and the surfaces to be glued were flat and parallel, all using a jointer. This will take a fraction of a millimetre of each surface with each pass, but this is why we left extra wood on. This can be done with a hand plane if you don't have access to a jointer, but it's more work and less accurate.
3.25 Draw your body outline. I drew directly on the top of the body blank with pencil, using measurements I'd derived from pictures of the St Vincent guitar. I measured a printed drawing for that. Otherwise, templates are a good way to go. Pencil marks are quite inoffensive to wood and will get easily planed out during final finishing. If you're gonna be making a few pieces of your own unique body shape, you can even make your own template by following the steps in this section (3.xx) but on some kind of hard particle board, acrylic, or whatever makes a good template (I don't know!)
3.5 Cut it out! Depending on the shape of your body, a bandsaw will suffice (as here), though with more complicated curves, you may have to use a router or CNC.I cut slightly outside the line (~1mm) and would bring the surface in with a tool that has a better finish than the band saw.

--
We're getting there! Now, the laborious handwork starts. This took far more time and energy than the big cuts and machine routes.
4. I removed as much material as possible with power sanders, and basically got right down to the body outline. Maybe still just a shade outside.

4.25 I also started to cut the contours. In this case, painter's tape is really useful for marking don't-go-beyond lines, since we're removing wood on a plane that is tilted from the top of the guitar, and it's hard to keep track of this simply by eye. This didn't stop me from making a few mistakes so BE CAREFUL! (especially with the belt sander)

4.5 Final fine-finishing work on the contours was done entirely with hand tools:
- narrow gouge for the tummy cut
- block planes for sides that didn't curve or merge with another side at acute angles
- flat and curved spoke shaves for the sides and edges: I decided on a simple 45° beveled edge both for simplicity and for a little bit of a, more angular, modern style. I like a planed surface much more than a filed or sanded one. The result is surprisingly comfortable, but doesn't compare to a rounded edge.
- various size of chisels and gouges for the two sloped sides: it was impossible to simple plane these flat as they are compound curves. This also allowed us to get a little extra definition to the boundary between the surfaces by gouging a slight hollow into the sloping side along the edge where it meets the flat top.
- surfacing plane for the flat top. Plane until you can't feel anything but complete smoothness! Don't worry-- each pass only takes of hundredths of millimetres of material. I didn't want the grain to fill up so I didn't use sandpaper. This is purely preference
I really like the contrast between the flat-planed and gouge-worked surfaces on this: both are delightful to the touch. The tummy cut has quite pronounced gouges, while the sloped sections have a shallower texture using a much wider radius gouge.
--
5. 17 coats of shellac. I did this in a very non traditional style that's closest to Krenov-school woodworking. No stone dust, no polishing, just brush on and dry. I used a "wash" cut that was a little on the lighter side, and put on very light coats. The drying time for such an application is very fast-- just about a minute. The result is a little smoother, a little richer in colour, and retains most of the original texture of the wood. This does not protect the wood like a lacquer, french polish, or polyester finish like on most guitars-- it's just as soft as it was before. However, I intend for this guitar to show it's age and history, so I did this 100% intentionally.
5.5 8 coats of Birchwood Casey Tru Oil. Normally intended for the butt of your shotgun, this is great on guitars too. I put 8 light coats on both the body and neck (oil over shellac applied this way works just fine, as long as the shellac is dewaxed). I experimented with a bunch of different ways to apply (the internet has SO much to say about this) and in the end I found that the way that works best for me (once again a very simple application) is to have one cloth to wipe oil onto the body (this one gets quite soaked) and one cloth to wipe oil off (this one won't get so oily). Don't put on too much oil, and wipe ALL the excess off, get into corners and crevices, get it all out! The thinnest coat will also be the flattest.
The best cloth I found is old bedsheet: anything more absorbent will be hard to control and will leave application marks (my guitars have a few of those, but it's part of what I learned so you don't have to!). Oil coats take a long time to dry so be patient and don't rush through things before they are dry. Give a side ample time to dry before flipping it over and doing the other side, since oil is very good at remembered what touched it while it was wet.
Oil protects a little better than shellec, but still doesn't have much thickness or hardness to it.
5.75 I also gave the necks 8 light coats of Tru Oil each. They feel super nice.
--
Now it's time to put it all together!
6. Measure the hole to the cavity and make a little jack plate on the CNC machine. Once again, this is also doable with hand tools. I beveled the edges the same way I did on the body.
6.25 Mount stuff! The neck is pretty straightforward. You're looking for a tight fit. Mine was almost a little too tight, I should have put a few more fractional-mm tolerances into the pockets that I cut, but the necks went in, and tighter is obviously better than loose. The wiring had to go through the cavity before the bridge was mounted and the the saddles could only go on after the bridge was mounted, so the order of operations was pretty important.
6.375 Speaking of order of operations (and planning). I realised later while I was doing a little shakedown for this guitar, that the cavity has to be shielded, lest I pick up a mains hum. It was actually so bad that I couldn't tune the guitar-- the hum produced a constant G# on the line and the tuner wouldn't respond to anything else. I should have copper-taped the cavity before gluing the body blocks together, and/or made it a little roomier so that I wouldn't be stumbling over my own fingers trying to do it afterwards. I succeeded in copper taping the finished body after much more effort than should have been necessary, and the hum disappeared.
6.5 Finish your electronics (solder the right things together based on your plan, and make sure you connect the cavity shielding to ground). I had a simple time because I don't even have a volume pot. Use heat shrink tubing to keep connections isolated from everything else (hint: you have to put these on the wires before you solder things together, and then slip them over the joints after that). Use tape or string to keep wires neatly bundled, where applicable.
6.75 String up, set up (take as long as you need to do intonation right because this is one thing that will make your guitar sound not terrible!). It's very important to have a good tuner, and I use a Mooer Baby Tuner line-tuner to make sure I'm working with exactly what's going out of the jack.
--
7. Enjoy your guitar! This one is particularly snappy and responsive. It's got a 1" thick soft-V neck (one of my preferred profiles to hold in the hand and coincidentally one of the stiffer ones), a very tight neck fit, and almost no air space in the body, all of which I think contribute to this. I don't miss having a volume control. Piezo pickups have crazy dynamic response: it's a challenge to keep a constant volume, but that's what compressors are for.

Huge (our blue friend over here, long-serving house guitarist, and yes, he is smiling) runs the guitar through a Sansamp Paradriver straight to the amp / console. On "plain" preamp it could pass for a jazz box (can't make it sound hollow enough to imitate a flat top, but this was never intended), and with the impedance matching and gain that the pedal provide, it can push an amp like any magnetic pickup-equipped guitar.
----
Thanks to:
HEI -- for machine access
Christian Schürmann -- taught me to CNC. I continue to resist learning good documentation.
Andi Pfister -- for fine wood work
Ed Ricco -- for some early inspiration and a LOT of questions answered along the way. PS, this dude is also an exquisite musician.
Graph Tech -- was also very helpful and responsive with my questions
I haven't been completely idle-- I recently built a couple of guitars! When I tell people this they usually say "oh wow, that's impressive!" or "oh wow, that must have been really hard!" But really, it wasn't so bad at all.
Now, I'd set out to do this with the explicit idea that I would document it for my (and yours as well, gentle reader) reading pleasure and future reference (since it's quite likely not my last guitar). I am after all still young and have a lot left to do in my life. At least that's what I keep telling myself. So. Here it is!
First things first.
-Solid body instruments are much easier than hollow, and need much less tooling to accomplish. This will be A Guide for Solid Body Guitars.
-You don't need to make a neck either, if that's intimidating, since this might be your first time too. Or maybe it's not. The neck is the hardest of any single part to build, and this project was as much about having an awesome end-product as it was about making stuff myself. Sometimes, to make something really awesome, you need help from people who really know how to do things. Warmoth makes excellent necks at great prices and is very good value.
-If you think you might make more than one guitar, do them in parallel. Going through all-the-steps-of-building-a-guitar right after you went through all-the-steps-of-building-a-guitar is probably a lot more pain than doing each step for twice as long. For me, anyway.
Look at that, we're getting into useful information already.
----
Now on to the concrete things.
Stuff you'll need:
A plan
-The better you know the thing that you're going to build, the easier, more efficient and less painless you'll be
Think through all the details:
-exact-as-possible lengths, depth and breadths of every part of the body
-what dimensions and heights of surfaces are required to mount hardware? (what hardware exactly? what are the dimensions of that?)
-how will you finish edges and surfaces? Is
-what tools can work on
I'll talk through my own plan as I detail my process. I'm deliberately holding out on showing you what I did until I talk through a bit of groundwork. After all, I don't want you to build a guitar like mine, I want my guitar build to benefit yours. Before you look at my first picture too hard, work through as much of this process on your own!
Okay, NOW concrete things:
Tools
I got lucky with tooling. Here's what I ended up using:
CNC milling machine // I have access to an open workshop in town where I can use some pretty beefy machines
Circular saw // "
Bandsaw // "
Jointer // "
Drill press (and bits) // "
Soldering iron // ditto up til here
Hand drill
Power sanders (band and orbital) // these can be surprisingly cheap on ebay
Pencil
Straight edge
Right angle
Chisel(s)
Gouge(s)
Block plane
Spoke shave(s) // these all belonged to my friend Andi
Screw drivers
Friends
I am lucky. One of my best friends is a carpenter and did some difficult (and amazing gouge work for me). If you need intros to machines or think you'll need to use tools you don't yet have access to or the skills to use, knowing the right people can be extremely helpful.
Okay, now on to
Raw materials / Parts
Here's what I used and it's just about the slimmest set of ingredients you'll be able to get a working guitar out of:
Warmoth neck (+tuners)
Wood for the body (I used maple, walnut and mahogany I bought on ebay)
Bridge (Hipshot string through)
Pickups (Graph Tech ghost saddles + summing board)
Aluminium sheet (for self made jack plate)
Assorted hardware: mono jack, screws, strap buttons, etc.
Cloth
Shellac (and alcohol)
Gun oil (Birchwood Casey Tru Oil)
Copper shielding tape
Shellac and gun oil make a beautiful, but in my case very thin finish that doesn't provide much protection to the wood. This is a conscious decision on my part that my guitar will show its age. Use a polyester or nitrocellulose finish for something more durable.
----
The moment we've all been waiting for! I built two guitars, and here they are:
 |
| yes, that's the bed I sleep on. |


Cool, no? Yes, they are electric, and yes, there's a lot that's strange about them. All will be clear soon enough.
**DISCLAIMER** I'm not going to teach you how to use a CNC machine, or a spoke shave, or a soldering iron, or how to glue up, or even how to string a guitar! Because if I do, I'll probably be the worst guide on the internet. If you want to do these things but don't know to do them yet, read something a real expert wrote, or get one to help you. That's what I did **DISCLAIMER**
I'm going to try as much as possible to give you knowledge you won't find anywhere else.
----
My steps:
0. Make a plan! Since I'm
0.5 My plan had lots of odd details, it makes more sense to read about them as part of each step of making the guitar.
I started with the idea of a piezo-only solidbody as the ultimate rough-playing easy-setup feedback-free guitar. As I dug around the internet for anything that might help me, I found it had been done already. I also like things to have twins/siblings-- but you already knew I was weird.
0.75 Right, so, make sure you scour the internet for everything anyone's ever done in the direction of what you're doing before you start.
--
1. Buy a pair of necks from Warmoth. They're Pau Ferro on Purpleheart, chosen for colour and stability when unfinished, and quite standard otherwise.
1.5 Buy wood (I decided on the neck woods for visual contrast with the body woods, and the body woods for contrast with each other. The wood itself has much less impact on the sound than neck profile, scale length, pickups, fret material, etc). This was from the outset always to be a weird guitar, and I decided on a zebra pattern of light and dark woods: maple, heart+sap walnut, mahogany.
1.75 Buy bridges from Hipshot. It's good to have neck and bridges on hand before doing any cutting or drilling, so that you can measure them for exact fits.
--
2. Make some drawings. Since I only had to worry about neck and bridge positions this wasn't too hard. I found some Stratocaster and Precision Bass plans on the internet to figure out an accurate technical diagram of the neck pockets. I used Hipshot documentation and some hand measuring for the bridge drilling and placed it on the same drawing as the neck pockets. I had to do a bit of guesswork about where the nut is in relation to the pocket, but I did my best to place the bridge drilling where scale length, measured from the nut, would be in the middle of the bridge's adjustment range.
): I momentarily deleted my cad software, but if you want a .dxf of what I used, just message me and I'll make it available to you!
2.25 Ready your wood! I used the heavy duty circular saw and thickness planer at the open workshop to take each block of wood down to the required size. This really depends on what format your guitar body is gonna be, but it's almost certainly easiest to start with rectangular blocks, glue them together, and then shape that as one piece. I left a bit of extra wood on (0.5-1mm) because these were not final surfaces, and would get taken down again during other steps in the process.
2.5 Cut some wood! I built some gcode off my drawings, fed that into the CNC machine and had it cut the neck pocket and bridge drilling for me without moving the wood block. This ensures that there is minimal misalignment of bridge with neck. If you don't have access to a CNC machine, Stewart-Macdonald sells templates for routing neck pockets with a hand router, and some good ol' hand measurment for bridge drilling can work out just fine (I didn't trust myself at that point)
 |
| it's always good to do a test piece. |
 |
| and it's a fit! |
 |
| now let's go for it |
2.75 Cut some more wood. This is a very optional step and perhaps one of the oddest things about these guitars: I didn't want a front or a back side pickguard or cavity access in order to have as much uncovered wood on the guitar as possible. I cut the cavity into the sides of each wood block before they were glued together. They would line up when the wood was joined, and the access hole would be revealed when the top of the guitar was sloped down. I had to do a bunch of fancy geometry to figure this out. If this is your route, draw it out on paper. It really helps!

2.875 If this is your first time doing something like this, you're gonna make a few mistakes for sure. Sometimes it's a drawing error, sometimes it's a machine code error because you forgot to set the tool size, sometimes it's very careless and simply not stopping a cut before the collet touches the workpiece. Don't be discouraged. Some of these are reversible, and some of these aren't so bad in the end.
 |
| oops! |
 |
| oooops!! fortunately this is mostly hidden by the fretboard |
 |
| the only reversible one of these three mistakes. even the correctly placed holes were too big, so I had to glue dowels in and then drill smaller holes again. |
--
3. Glue the body blocks together. I used simple white glue: most carpentry is done with this kind of glue: it dries stronger than the wood it will join. I made sure the blocks were the same height and the surfaces to be glued were flat and parallel, all using a jointer. This will take a fraction of a millimetre of each surface with each pass, but this is why we left extra wood on. This can be done with a hand plane if you don't have access to a jointer, but it's more work and less accurate.
 |
 |
| the bass needed a bit of tweaking from the original body contour, but resulted in some very cool shapes! |
3.5 Cut it out! Depending on the shape of your body, a bandsaw will suffice (as here), though with more complicated curves, you may have to use a router or CNC.I cut slightly outside the line (~1mm) and would bring the surface in with a tool that has a better finish than the band saw.

--
We're getting there! Now, the laborious handwork starts. This took far more time and energy than the big cuts and machine routes.
4. I removed as much material as possible with power sanders, and basically got right down to the body outline. Maybe still just a shade outside.


 |
| sorry, painter's tape not pictured. basically, you stick it on the side of a straight line that you don't want to remove material from. |
4.5 Final fine-finishing work on the contours was done entirely with hand tools:
- narrow gouge for the tummy cut
- block planes for sides that didn't curve or merge with another side at acute angles
- flat and curved spoke shaves for the sides and edges: I decided on a simple 45° beveled edge both for simplicity and for a little bit of a, more angular, modern style. I like a planed surface much more than a filed or sanded one. The result is surprisingly comfortable, but doesn't compare to a rounded edge.
- various size of chisels and gouges for the two sloped sides: it was impossible to simple plane these flat as they are compound curves. This also allowed us to get a little extra definition to the boundary between the surfaces by gouging a slight hollow into the sloping side along the edge where it meets the flat top.
- surfacing plane for the flat top. Plane until you can't feel anything but complete smoothness! Don't worry-- each pass only takes of hundredths of millimetres of material. I didn't want the grain to fill up so I didn't use sandpaper. This is purely preference
 |
| Andi's workbench! you can start to see the cavity access holes emerge as the top comes down through the cavity's volume. this was all planned and fortunatel worked out great! |
 |
| Andi's amazing chisel work to get shape the flat of the top around the bass bridge. you can also see a mistake I made with the belt sander just behind it. |
 |
| a little extra relief at the boundary of the flat / sloped top |
 |
| Andi's superfine gouge work |
 |
| spoke-shaved bevel |
 |
| end-on view of the bass. to note: edge and corner bevels, chisel-cut platform on the flat top, and you can also see the compound plane of the sloping top |
I really like the contrast between the flat-planed and gouge-worked surfaces on this: both are delightful to the touch. The tummy cut has quite pronounced gouges, while the sloped sections have a shallower texture using a much wider radius gouge.
--
5. 17 coats of shellac. I did this in a very non traditional style that's closest to Krenov-school woodworking. No stone dust, no polishing, just brush on and dry. I used a "wash" cut that was a little on the lighter side, and put on very light coats. The drying time for such an application is very fast-- just about a minute. The result is a little smoother, a little richer in colour, and retains most of the original texture of the wood. This does not protect the wood like a lacquer, french polish, or polyester finish like on most guitars-- it's just as soft as it was before. However, I intend for this guitar to show it's age and history, so I did this 100% intentionally.
 |
| mmmmmm...just look at that curl in the walnut! |
5.5 8 coats of Birchwood Casey Tru Oil. Normally intended for the butt of your shotgun, this is great on guitars too. I put 8 light coats on both the body and neck (oil over shellac applied this way works just fine, as long as the shellac is dewaxed). I experimented with a bunch of different ways to apply (the internet has SO much to say about this) and in the end I found that the way that works best for me (once again a very simple application) is to have one cloth to wipe oil onto the body (this one gets quite soaked) and one cloth to wipe oil off (this one won't get so oily). Don't put on too much oil, and wipe ALL the excess off, get into corners and crevices, get it all out! The thinnest coat will also be the flattest.
The best cloth I found is old bedsheet: anything more absorbent will be hard to control and will leave application marks (my guitars have a few of those, but it's part of what I learned so you don't have to!). Oil coats take a long time to dry so be patient and don't rush through things before they are dry. Give a side ample time to dry before flipping it over and doing the other side, since oil is very good at remembered what touched it while it was wet.
Oil protects a little better than shellec, but still doesn't have much thickness or hardness to it.
5.75 I also gave the necks 8 light coats of Tru Oil each. They feel super nice.
 |
| my home oiling station |
Now it's time to put it all together!
6. Measure the hole to the cavity and make a little jack plate on the CNC machine. Once again, this is also doable with hand tools. I beveled the edges the same way I did on the body.
6.25 Mount stuff! The neck is pretty straightforward. You're looking for a tight fit. Mine was almost a little too tight, I should have put a few more fractional-mm tolerances into the pockets that I cut, but the necks went in, and tighter is obviously better than loose. The wiring had to go through the cavity before the bridge was mounted and the the saddles could only go on after the bridge was mounted, so the order of operations was pretty important.
6.375 Speaking of order of operations (and planning). I realised later while I was doing a little shakedown for this guitar, that the cavity has to be shielded, lest I pick up a mains hum. It was actually so bad that I couldn't tune the guitar-- the hum produced a constant G# on the line and the tuner wouldn't respond to anything else. I should have copper-taped the cavity before gluing the body blocks together, and/or made it a little roomier so that I wouldn't be stumbling over my own fingers trying to do it afterwards. I succeeded in copper taping the finished body after much more effort than should have been necessary, and the hum disappeared.
6.5 Finish your electronics (solder the right things together based on your plan, and make sure you connect the cavity shielding to ground). I had a simple time because I don't even have a volume pot. Use heat shrink tubing to keep connections isolated from everything else (hint: you have to put these on the wires before you solder things together, and then slip them over the joints after that). Use tape or string to keep wires neatly bundled, where applicable.
6.75 String up, set up (take as long as you need to do intonation right because this is one thing that will make your guitar sound not terrible!). It's very important to have a good tuner, and I use a Mooer Baby Tuner line-tuner to make sure I'm working with exactly what's going out of the jack.
--
7. Enjoy your guitar! This one is particularly snappy and responsive. It's got a 1" thick soft-V neck (one of my preferred profiles to hold in the hand and coincidentally one of the stiffer ones), a very tight neck fit, and almost no air space in the body, all of which I think contribute to this. I don't miss having a volume control. Piezo pickups have crazy dynamic response: it's a challenge to keep a constant volume, but that's what compressors are for.
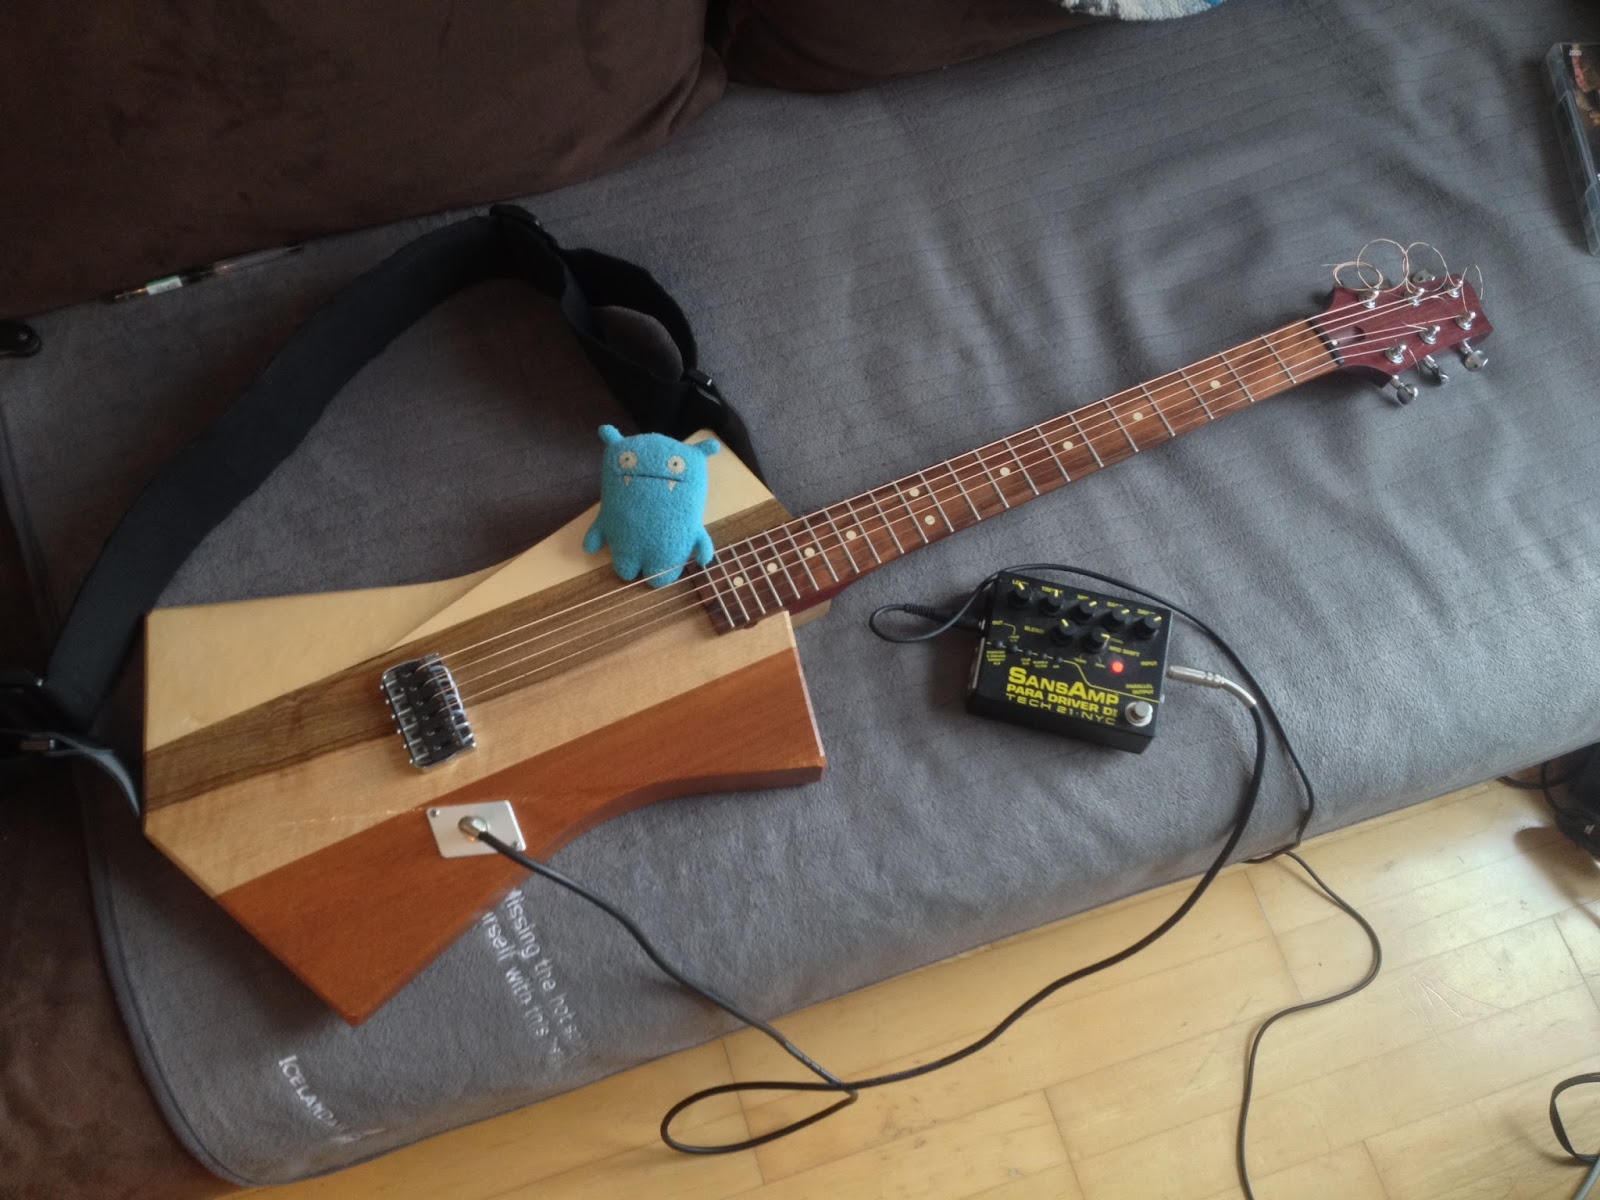
Huge (our blue friend over here, long-serving house guitarist, and yes, he is smiling) runs the guitar through a Sansamp Paradriver straight to the amp / console. On "plain" preamp it could pass for a jazz box (can't make it sound hollow enough to imitate a flat top, but this was never intended), and with the impedance matching and gain that the pedal provide, it can push an amp like any magnetic pickup-equipped guitar.
----
Thanks to:
HEI -- for machine access
Christian Schürmann -- taught me to CNC. I continue to resist learning good documentation.
Andi Pfister -- for fine wood work
Ed Ricco -- for some early inspiration and a LOT of questions answered along the way. PS, this dude is also an exquisite musician.
Graph Tech -- was also very helpful and responsive with my questions


No comments:
Post a Comment